Open Hips With Cow Face Pose

IMG_0896

Pose of the Week: Cow Face or Gomukhasana

This pose is suppose to look like a cow face… Let me know if you see it! I am still looking! Cow face goes along with our hip opening theme of the month perfectly because it stretches the hips, ankles, and thighs. But in a very different way from the first two poses. In this pose our legs are externally rotated and crossing over the midline of the body. In our first two poses of the month, our legs were externally rotated but moving away from the body’s midline. I have chosen to do this pose with the arm various of eagle arms. This is a non-traditional form, but I think it goes great with cow face.

Moving Into Gomukhasana:

1. Start by sitting tall on your mat with legs stretch out in front of you, Dandasana. Inhale, sit up taller and exhale navel to spine.

2. Slide your right foot underneath your left leg towards your left hip, then slide your left foot towards your right hip.

3. At this point, heels should be close to hips, and left knee is stacked on top of the right knee. Take a breath here, and begin to settle into the position. As needed, you can shift your feet out farther from your hips or keep them in close.

4. Eagle arms: With right thumb pointing up, reach the right arm underneath the left arm. Weave your right arm around the left so that your right fingers reach into the left palm. You can press your fingers into the left palm or hook them around your left thumb. Whatever feels comfortable!

5. Once in position, inhale reaching your hands up towards the sky increasing the stretch across your upper back. Once you have reached your hands up to their peak exhale.

6. Hold the pose for 30 seconds to 1 minute or 5 to 10 breaths.

7. Slowly, unwind your arms and uncross your legs.

8.Repeat for the opposite side holding for the same length of time.

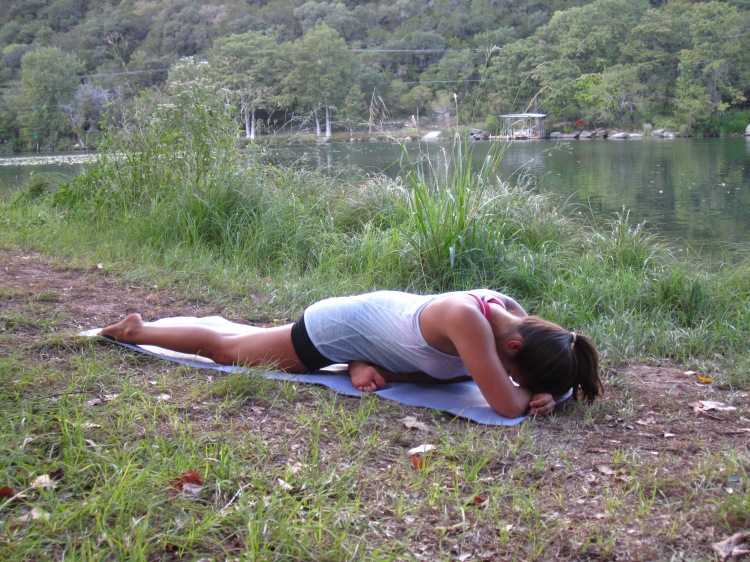
Progression: To enhance this position, walk your feet farther away from your hips with toes pointed towards the front of your mat (refer to picture at top of page). A second option is to fold forward once in cow face with eagle arms.

Modifications: If you are not able to stack your knees on top of one another, sit on a block, bolster, or rolled up towel. I do not recommend this pose if you have neck, shoulder, hip, or knee pain.

I hope you enjoy the pose of the week!

– Lauren 🙂

Why Do I Love Pigeon Pose?

IMG_0891

Pose of the Week: Pigeon Pose or Eka Pada Rajakapotasana

Pigeon is one of my favorite poses! I try to incorporate it into my daily practice.  Pigeon pose helps relieve physical and emotional tension that we store in our hips. This pose focuses on stretching your thigh, groin, and psoas. If this is your first time trying it, be patient! Not going to lie, it can feel uncomfortable at first. As you begin to release tension, you will start to feel more open, relaxed, and optimistic!

Moving into Pigeon:

1. To move into pigeon start from downward facing dog, Adho Mukha Svanasana.

2. In downward facing dog, inhale, lift right foot off the mat and move your right knee behind your right wrist and right ankle underneath your torso.

3. Exhale, slowly lower your hips to the mat with your left leg straight behind you. The sole of your left foot is facing up.

4. Inhale, sit up tall with each hand on either side of your hips. Typically, the left hip will be moving backwards giving the illusion of being more flexible in the right hip. To correct this, check to make sure your hips are squared off. Exhale, engaging your core and flexing the right foot.

5. Hold this pose for 30 sec. to 1 min. or 5 to 10 breaths.

Remember: Your leg does not have to be parallel to the top of your mat. If you are able to achieve this, that is great! But don’t feel pressured to yank your foot forward towards the front of the mat. I use to do this all the time thinking I was progressing. In reality, I was losing alignment in my hips and injuring my knee. Everyone is made differently, do what feels right for your body!

IMG_0893

Progression: Sleeping Pigeon 

1. To find a deeper stretch in pigeon, inhale and square your hips off drawing the belly button to the spine.

2. Exhale, fold forward to bring your chest onto or towards the ground.

3. Two Options: 1. You can rest your head on your forearms.  2. Turn your head to the side resting your chest and head on the ground with arms stretched out.

Modifications:

If first two options are not working for you, feel free to place a block or sand bag under your hips to elevate them. To relieve knee pain bring your right foot closer into your body (like my foot in the top picture).

I would avoid this pose if you have had a knee injury, ankle injury, and/or sacroiliac injury.

– Lauren 🙂